FITS HAYWARD POOL VACUUM CLEANERS
Replacement Vacuum Cleaner Brushes
- Quantity
- 3 brush strips
- Bristles
- Blue, slotted segments
- Backing
- Curved aluminum strip
- Replace when
- Bristles shortened or splayed

SAND & DE FILTER PARTS
A pressure gauge and a set of vacuum brushes are the two cheapest parts on your pad — and the two that quietly decide whether your pump lasts eight years or three. Here's what we sell, how to install it, and how to read what it's telling you.

The only number that matters is the gap between where your gauge sits now and where it sat when the filter was clean.
Confirm fitment against your own equipment before ordering — thread size and dial diameter vary between filter manufacturers.
FITS HAYWARD POOL VACUUM CLEANERS
SAND & DE FILTER SYSTEMS
SPX1700FG · HAYWARD-COMPATIBLE · 2-PACK
Installation
General guidance for typical residential equipment. Your filter's own manual takes precedence over anything here — thread sizes, housing designs and shutoff arrangements differ by manufacturer.
Shut the pump down at the breaker and disconnect the vacuum head from its hose before handling it.
Lift the cleaner out of the pool and set it on a flat surface where you can see the underside. Rinse off debris so you can see the brush mounts clearly.
Note how the old brushes sit before removing them — orientation and position vary by head, and a photo on your phone saves guesswork later.
Release the worn brushes from their mounts. Depending on the head design these either slide out of a channel or unclip from retaining tabs. Don't force a clip that isn't moving; look for the release first.
Inspect what's underneath while the head is open — check the mounts for cracks and the wheels or tracks for wear. This is the easiest look you'll get all season.
Seat the new brushes in the same orientation, pressing until each is fully home in its channel or clip. A partially seated brush works loose and disappears into the pool.
Confirm all three sit level with each other. Uneven brushes make the head track crooked and wear unevenly.
Reconnect the hose, restore power, and watch the first few minutes of operation to confirm the head is tracking normally.
Kill power at the breaker. A timer can energize the pump while your hands are on the filter; the breaker cannot.
Relieve all pressure. Open the air relief valve on top of the filter and wait until air stops escaping and the old gauge reads zero. Do not skip this or judge it by eye.
Note the old gauge's orientation so the new one ends up facing where you can actually read it from.
Unthread the old gauge counterclockwise. A wrench on the gauge's hex base — never on the dial housing — will break it loose if it's stiff. Expect a small amount of trapped water.
Clean the fitting threads and remove all old tape or sealant residue. New tape over old is the most common source of a leak.
Check that the new gauge matches the old one's thread size and mount direction before you tape it. These are bottom-mount gauges — the stem enters from below the dial. Confirm the thread against your filter's fitting rather than assuming.
Wrap 2–3 turns of PTFE thread tape clockwise around the new gauge's threads — the same direction it will screw in, so tightening doesn't unwind it. Leave the first thread bare.
Hand-tighten, then a quarter to half turn with a wrench on the hex base only, stopping with the dial facing you. Overtightening cracks housings and strips fittings; this is a low-torque fitting.
Close the air relief valve, restore power, and start the pump. Purge air through the relief valve until you get a steady stream of water, then close it.
Watch the fitting for two full minutes under pressure and check for weeping at the threads. Then write down the reading — with a clean filter, this number is your baseline, and everything you do from here is measured against it.
Kill power at the breaker and let the system depressurize through the air relief valve before opening any port.
Expect water. Pulling the plug drains the pump housing — have the area clear and know where the water will go.
Remove the old plug counterclockwise. The slotted head takes a flat screwdriver; the hex head takes a wrench. Don't lever against the housing.
Find the old gasket. It often stays behind in the port rather than coming out with the plug. A new plug seated on top of an old gasket will not seal.
Clean the sealing surface — grit on the seat is what turns a good gasket into a slow drip.
Seat the new gasket on the plug, not in the port, and make sure it sits flat in its groove without twisting.
Thread in by hand until snug. These seal on the gasket's compression, not on thread torque — and they take no thread sealant or tape. A wrench past hand-tight cracks plastic housings — this is the most common way people damage a pump.
Restore power and watch the plug for the first few minutes under pressure. A weep now is far cheaper to fix than a flooded pad later.
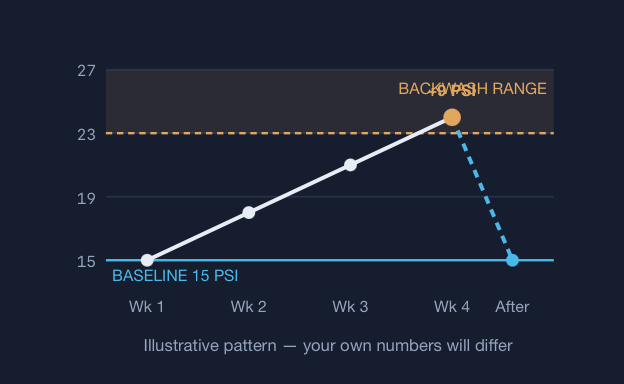
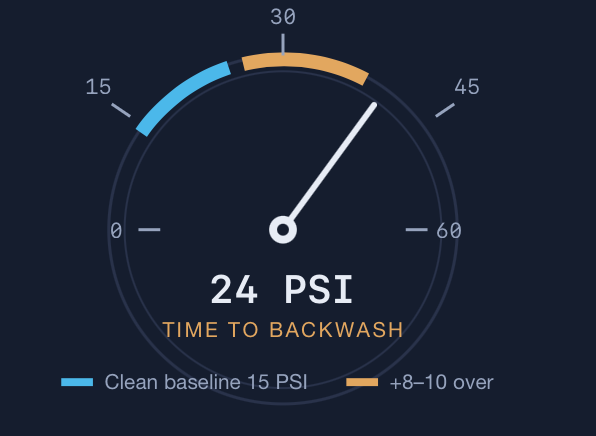
Start by establishing your baseline. Right after a backwash or a fresh cartridge, with the system running and air purged, write down what the gauge reads. That number is specific to your pool — pump size, plumbing and filter type all move it. A neighbor's normal reading tells you nothing about yours.
The working rule: 8–10 PSI above baseline means clean or backwash the filter. That rise is the filter doing its job — captured debris restricting flow. Below that gap, the media is still filtering effectively; a little loading actually improves fine-particle capture. Above it, you're throttling your own circulation and loading the pump.
An unusually low reading is a problem too, and it gets ignored. Pressure below baseline points to restricted flow before the filter, not after it — a clogged skimmer or pump basket, a blocked impeller, a closed valve, or a suction-side air leak. The instinct is to feel relieved by a low number. Go check the baskets instead.

Pressure climbs steadily as the filter loads. When the gap hits 8–10 PSI over baseline, backwash — and the reading should return close to where it started.